1. Understanding Virtualized Machine Components
Whenever a new virtual
machine is created, some necessary hardware components are allocated
through the use of software emulation. Think about it. Whenever you use
an individualized operating system, it has to access its own hard drive,
network card, and system memory. Some of these components are vital for
operation. Say, for instance, you're running an instance of SUSE Linux,
and you're going to be using this instance of Linux to run a website
that takes advantage of PHP Hypertext Preprocessor (PHP). To do this,
you'd need to have an individual installation that had its own network
settings, memory, and disk. Imagine for a moment that this is a
medium-traffic web server. The I/O operations alone would be difficult
for a single server to hold, but since this is a consolidated and
"hypervised" (monitored by Hyper-V) system, it's even harder to
maintain.
A lot of the reason behind
this is that although there may be two operating systems running two of
every single operating component, on most low-end, low-cost servers
there is only one memory bus, or one memory card, and maybe even one
RAID configuration. And that isn't likely to change. Thus, the
hypervisor has the task of determining where the resources are
allocated. At times, this can be very complicated.
Thankfully, most of what
the hypervisor does has been automated to a point that it doesn't
require much administrative work on the part of the lowly administrator
who has been tasked with designing a consolidated server role. Really,
using Hyper-V is as simple as opening up the virtualization management
console (VMC).
1.1. Using the Virtualization Management Console
The VMC in Windows Server 2008
is called the Hyper-V Manager. Using the Hyper-V Manager, you're allowed
access to the central brains of the hypervised machines. Here, you can
create new virtualized machines, take snapshots, manage the licensing,
and alter the hardware settings discussed earlier. You can access the
VMC by selecting Start => Administrative Tools => Hyper-V Manager.
1.2. Snapshots
If you've used Windows XP or Windows Vista, a snapshot
is pretty easy to understand. In a way, it's similar to a system
restore. A VM snapshot gives you the ability to take a "photo" at a
certain time of the condition of that virtualized operating system. The
mother operating system (Windows Server 2008 when using Hyper-V) has the
virtual machine record a data list of all its settings that will allow
you to roll back to the previously established settings within Hyper-V
at any point. So, if for some reason your virtual machine stops working,
you can revert to a snapshot and continue working unimpeded as if
nothing ever happened. Of course, any changes made after the snapshot
will be lost. But part of the real advantage of snapshots is that you
can decide where you want to place them on the system. This is useful if
you want to deposit a snapshot on an external resource, such as a
networked drive or external hard drive, for recovery purposes.
NOTE
Snapshots are not
exclusive to Windows Server. Snapshots are used in all sorts of
virtualized machine software, such as VMware and Parallels for the Mac.
In case you're interested in being certified on another platform, this
is good information to remember.
1.3. Failover and Recovery with Hyper-V
One of the primary
objectives of Hyper-V is, surprisingly, disaster recovery. When you
first think about it, this may not make a lot of sense. At first glance,
Hyper-V is just virtualization software that allows the really nifty
deployment of other platforms. However, there's more to it than that.
Using Hyper-V and snapshots, administrators are able to take entire
installations and store them at a given point and time.
Logically, this means
that these snapshots are available for recovery. Thus, failover recovery
is quite easy. And furthermore, in the case of an upgrade or move, the
process of migration is greatly simplified because downtime is almost
entirely removed. But the final advantage of Hyper-V is that it also
supports Volume Shadow Copy.
2. Network Setups with All Types of Virtual Machines
When a virtual machine is
initially created, you can set it up in several ways. But of particular
concern to most any administrator is the method that allows you to
possibly use a single network card for multiple computers. In sharing
the Ethernet port, you have three available options: using the host's
NAT, using a bridged connection, and allowing only a network with the
host.
2.1. Host NAT
Using host NAT, the host
actually creates a virtualized DHCP pool and assigns an IP address to
the virtual machine running in it. This is ideal for a machine that
won't have to be communicated with but will communicate with machines
outside the network. The reason behind this is that NAT, by its very
nature , serves as an
internal firewall. It's kind of funny, but by installing a virtual
machine and using host NAT, you are effectively setting up a machine
within a software firewall.
This said, the machine can
still reach out and access the Internet, send email, and do the tasks it
needs to perform in order to function (most of the time). Problems
start to arise only when you want to use this server for, say, a web
server or for a platform such as Microsoft Exchange. This is relatively
difficult, if not impossible, because NAT doesn't play well with others.
2.2. Bridged Connection
A bridged connection is by far
the best method if it's available. Using a bridged connection, the VM
creates its own unique IP address and authenticates to the network as if
it is something completely separate. It can be a pretty surreal feeling
to look at two distinct machines on one computer, each with their own
network card. It still makes many of us say, "Huh. . .well, that's
something." Not only does the virtual machine function on the same
network, but outside resources from your network can individually access
the logical address of that virtual machine and have no idea that it
isn't really a whole other entity. To them, it just looks like another
host.
2.3. Host Only
The least desirable
method of connection is to allow connection only with the host. This
creates an environment where VMs cannot communicate with the outside
world and can run only in the virtual environment. Sometimes, this can
be useful if you'd like to test a software program in a secure
environment, because the two OS installations can still communicate. But
it has little other practical use and is thus less common.
3. Virtual Networks
Now that you understand how
network cards can be physically shared through software implementation
(try getting your head around that for a minute!), let's talk a little
bit about virtual networks and the role they play within Windows Server
2008 Hyper-V installations.
When you first set up a Hyper-V installation, you have the option of creating special types of virtual networks. In total, there are three types: internal virtual networks, external virtual networks, and private virtual networks.
Using a virtual network,
Windows Server 2008 Hyper-V can isolate communication types with child
machines. In the following sections, I'll discuss in detail each type of
network you can create.
3.1. Internal Virtual Networks
The primary use of an internal virtual network
is testing. Using an internal network, an administrator can create a
network that will communicate between the child virtual server and the
parent host server. This is convenient if you need to test applications
because it isolates the communication that will be done within the
virtual network. This enables the following types of communication:
3.2. External Virtual Networks
The word external in external virtual network
implies that the network is not necessarily a network outside the
virtual server but nevertheless can be accessed externally. This means
that users outside of the area you define within your network can access
the virtual server through its own unique IP address. This enables the
following types of communication:
Virtual child machine to virtual child machine
Virtual child machine to parent
Virtual child machine to outside world
3.3. Private Virtual Networks
A private virtual network
is created when you want two virtual machines to communicate but it's
imperative that they be able to communicate only with one another.
Usually, this is done for testing. For example, imagine you have an
application that needs two servers to run. Instead of getting two
separate computers and then installing operating systems on them both,
you can create two virtual machines and give them a private network to
communicate to each other. This enables the following type of
communication: virtual machine to virtual machine.
4. Multiple Network Interface Cards with Virtual Networks
The already-common practice
technique of using multiple network interface cards (NICs) for
different missions will be used even more in the future of Hyper-V.
Generally, the Microsoft documentation strongly encourages the use of
several Ethernet adapters because there are three distinct needs in a
virtualized operating environment:
The host OS (Windows Server 2008) requires a port.
The virtualized environment should have a dedicated port.
The iSCSI array (which is recommended) should have a dedicated port.
As you can see, the need for a
large amount of network connectivity grows extremely quickly.
Fortunately, Microsoft Windows Server 2008 supports a large number of
NICs already, including NICs that have onboard packet management and
other useful tools.
5. Installing Hyper-V
In the following exercises, you will apply what you have learned in the preceding sections by installing Hyper-V. To complete Exercise 1,
you must have a computer that supports at least Windows Server 2008
Standard edition and either AMD-V or Intel VT. You will not be able to
get past the first step of Exercise 1
if you do not have that hardware. In addition, please note that these
exercises build on one another, so you will need to do them in the
sequence presented here.
Once you have downloaded this update, double-click the .msu file, and install the update. The computer will ask you to reboot. Then, you can proceed with the install. Enable
hardware virtualization in the BIOS. The details of this step will vary
depending on who produced your BIOS. As an example, on a Dell computer,
you can achieve this by pressing F2 upon the computer startup,
navigating to the Performance portion of the BIOS, and enabling Intel VT
or AMD-V.
|
In the next exercise, you will proceed with the installation of Hyper-V. You must have completed Exercise 1 in order to do Exercise 2.
The
install process for Hyper-V begins like most any server role install
with Windows Server 2008. First click the Server Manager button, and
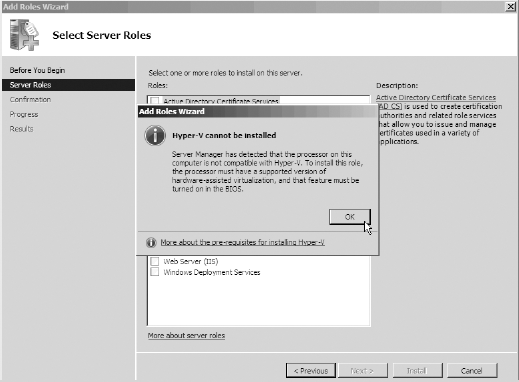
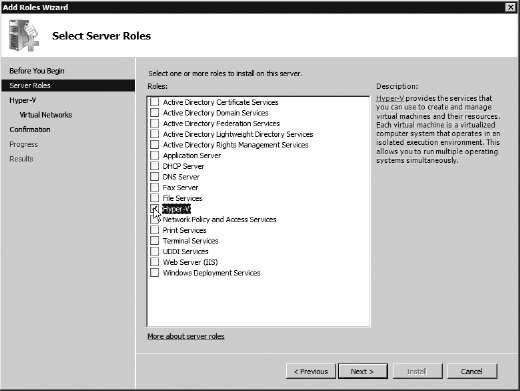
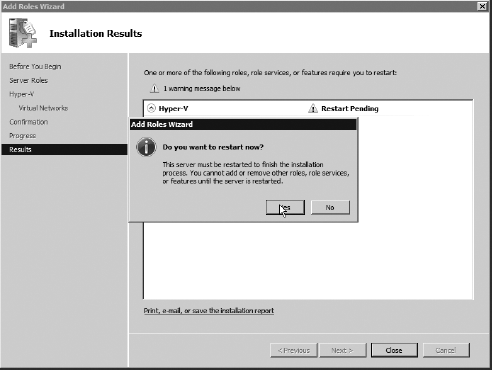
then select Add Roles => Hyper-V. At this point, if you do not meet the hardware requirements, you will be greeted with the warning shown here.
Otherwise, you will be able to select the Hyper-V check box, as shown here.
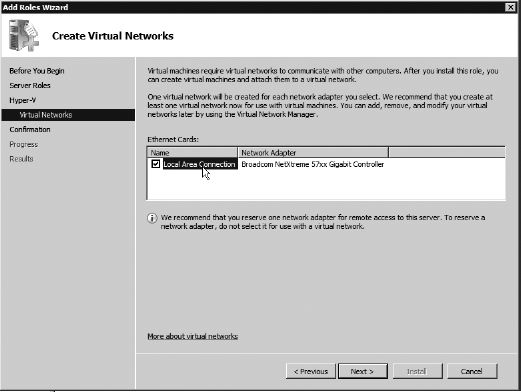
On
the next screen, you can select a network card for use in your virtual
network. In the example shown here, only one network card is available,
so you will choose that one. However, if you have multiple network cards
and don't select one, they would not be set up as virtual networks.
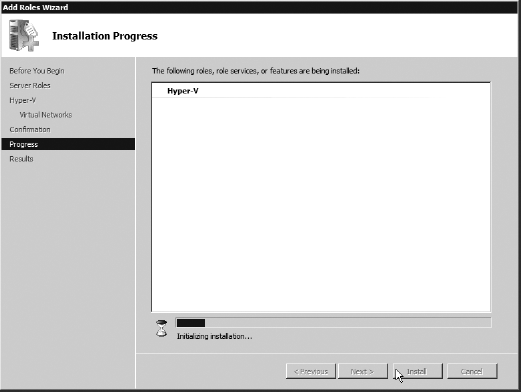
The install will continue, as shown here, after you click Next.
Once you've completed the install process, you will be prompted to close the installer and reboot, as shown here.
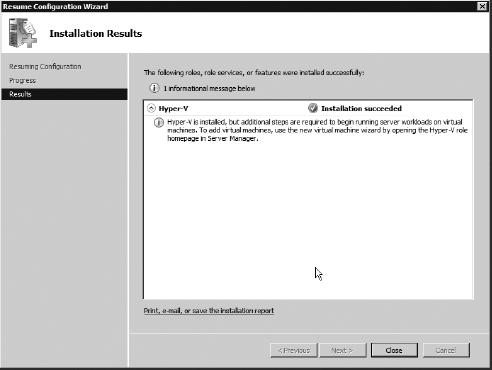
Upon reboot, the resume installer will begin. When complete, you'll be presented with a summary screen. Click Close.
|
In Exercise 3, you will set up Hyper-V. To complete this exercise, you must have completed Exercises 1 and 2.
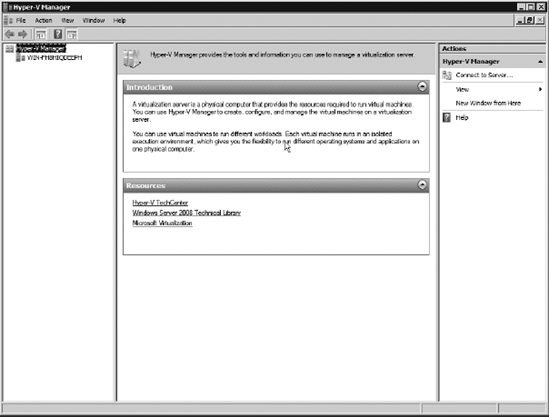
To begin setting up Hyper-V, select Start => Administrative Tools => Hyper-V Manager. This opens the Hyper-V Manager home screen shown here.
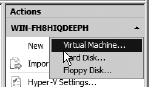
In the Hyper-V Manager, select the name of your computer, and in the upper-right portion of the screen, select New  Virtual Machine, as shown here. Virtual Machine, as shown here.
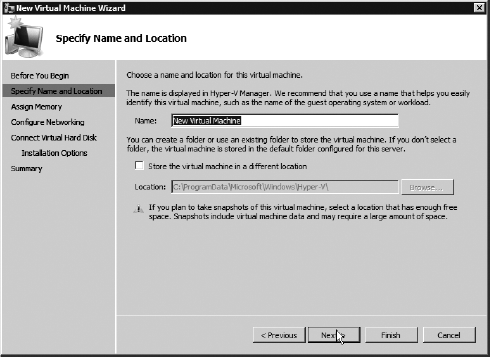
On the initial configuration screen, if it's shown, click Next. On the Specify Name and Location screen, name the virtual machine something appropriate, such as SUSE Linux. Click Next.
On
the Assign Memory screen, you can pick the amount of memory to be
assigned to this virtual machine. Keep in mind that this is limited by
the amount of memory you possess. For our purposes, 512MB should
suffice. Place this (if available) in your box, and click Next.

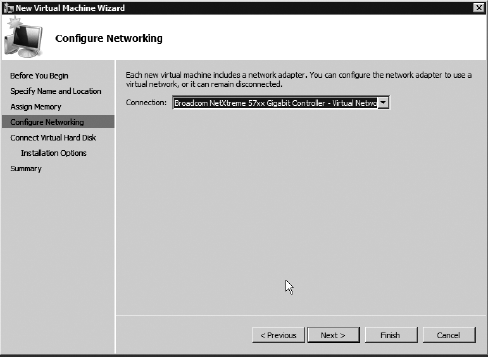
When
the Configure Networking screen appears, you can select from the
drop-down menu any virtual networks that have been created in this or
any previous installs. Otherwise, there will be no virtual networks.
Click Next when complete.
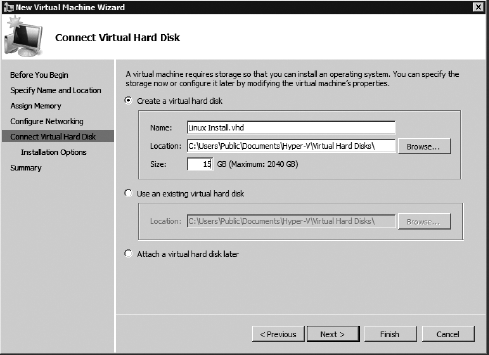
On
the next screen, Connect Virtual Hard Disk, you can choose to either
create a new hard disk or work from a preexisting virtual disk. In this
exercise, you will create a new disk and assign 15GB. Click Next when
complete.
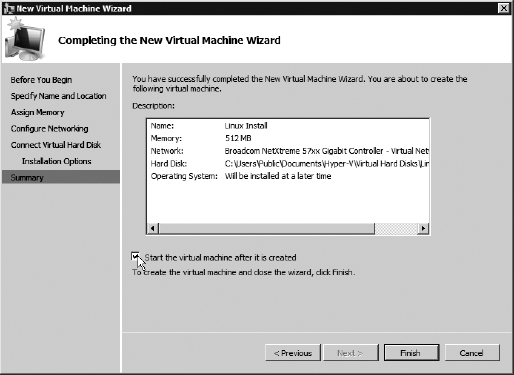
You will install an operating system later, so select Install Operating System Later, and click Next. When
the screen shown here appears and the Finish button is available, make
sure you select the check box to start the virtual machine upon exiting
the wizard.
|
In Exercise 4, you will install an operating system on a preexisting virtual machine. You must have completed Exercises 1 to 3 to do this exercise.
Upon
exiting the previous exercise, the virtual machine for your install
Linux Install should have begun and appeared on your screen, as shown
here.

To load a disk, it's recommended you download a version of SUSE Linux Enterprise edition for free from Novell.com.
Depending upon your choice, you can either burn it to DVD or leave it
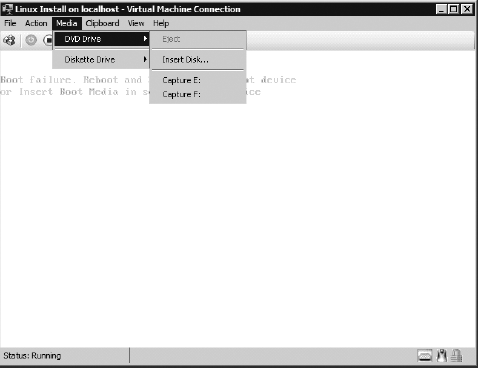
in ISO format. For this exercise, you will leave it in ISO format. Once it's downloaded, select Media => DVD Drive => Insert Disk, as shown here.
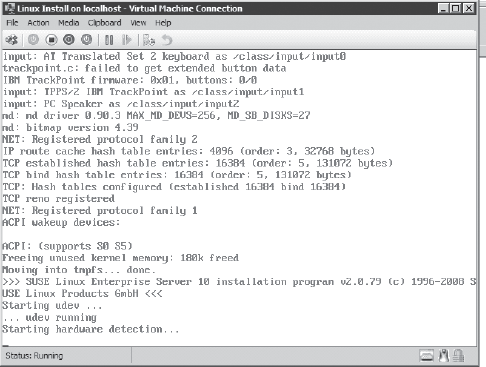
Select the location where your ISO is located, and then double-click it. Choose Action and then Reset. This will bring you to the default loading screen for SUSE Linux. Enter linux at the command prompt to begin the installation, as shown here.
Follow the installation instructions on the SUSE screen, and the machine will then start upon VM reboot.
|
NOTE
If you try to use
Hyper-V through Remote Desktop, the mouse will not be enabled unless you
turn on Integration Services, which is available through the Microsoft
Download Center (www.microsoft.com/downloads/).